

Master the fundamentals of hair colorimetry: color theory, levels and neutralization. The scientific foundation for formulating with precision.
In this article: What is hair colorimetry · Color theory · Color levels · Numbers after the period · Oxidant volume · Neutralization · Information to gather · Step-by-step formulation · Common mistakes · Common salon cases · Basic calorimetry problems · The calorimetry equation · Solving a problem (ALEKS-style) · The colorimetry method · FAQ · Summary
In summary: Basic colorimetry is the study of how color interacts with hair, built on three pillars: color theory (the color wheel and neutralization), the 1-10 level system with predictable lightening backgrounds, and reflections, whose numbering is defined by each brand (on the Spanish Majirel chart, .1 is ash, .3 gold, .4 copper). Master these and you can formulate with precision and predict results.
Why do some formulas work perfectly while others turn into disasters? The answer is colorimetry.
If you’ve spent time in the salon, you know that formulating color isn’t just mixing numbers. Behind every result there is a precise science that, once you understand it, changes how you work. The ash blonde that comes out perfect. The gray coverage with no surprises. The balayage with flawless transitions.
In this guide we’ll build the foundations of hair colorimetry together, from color theory to practical salon application. Everything you need to formulate with confidence.
If you already know the basics and want to start from the job in front of you today, go to the guide by type of work: blondes, gray coverage, toning, highlights, correction, brunettes and global color.
What is hair colorimetry?
Hair colorimetry is the science that studies how color interacts with human hair, allowing you to predict results with precision. It rests on three pillars: color theory (the color wheel and neutralization), the 1-10 level system with predictable lightening backgrounds, and the reflection system, whose meaning changes from brand to brand. Without these fundamentals, formulating is guessing.
It applies principles of physics, chemistry and visual perception to predict outcomes, formulate accurately and correct mistakes. The three pillars are:
- Color theory: the color wheel and complementary colors (orange-blue, yellow-violet, red-green) that let you neutralize unwanted tones.
- Level system: a scale from 1 (black) to 10 (platinum blonde), with a predictable lightening background at each level.
- Reflections and chemistry: the numbers after the separator define the tone according to the brand (Majirel: .1 ash, .3 gold, .4 copper), while oxidants (10-40 vol) control lift and damage.
The difference between a colorist who “tries it and sees what happens” and one who formulates with certainty comes down to these fundamentals. Let’s go through each pillar.
How does color theory work in hair colorimetry?
The color wheel organizes color into primary (blue, red, yellow), secondary (orange, green, violet) and complementary relationships. Complementary pairs (orange/blue, yellow/violet, red/green) cancel each other out. In the salon, this drives every neutralization: the orange of a level 5-6 background is cancelled with blue-ash, and the yellow of level 8-9 with violet.
The color wheel is your map of how colors relate. It builds on the Munsell notation system, which organizes color by hue, value and chroma. It sounds abstract, but you use it every day when you neutralize an orange or balance a violet.
Primary colors
The three colors that can’t be created by mixing others:
- Blue: the coolest, present in ash tones
- Red: the warmest, appears in dark backgrounds
- Yellow: luminous, appears in light backgrounds
Secondary colors
Formed by mixing two primaries:
- Orange = Red + Yellow
- Green = Blue + Yellow
- Violet = Blue + Red
(Image: hair color wheel with neutralization arrows showing complementary colors)
Complementary colors
Complementary colors aren’t a third category of color. They are a relationship: colors directly opposite each other on the wheel cancel each other out.
| Color | Complementary | Practical use |
| Orange | Blue | Neutralize warm lightening results |
| Yellow | Violet | Tone brassy blondes |
| Red | Green | Cancel red bases |
Mixing a color with its complementary in equal amounts gives a neutral tone (brown or gray, depending on level).
Pro tip: Avoid pure complementaries at 100%. Dilute them with a natural tone so the result doesn’t turn muddy.
What are color levels and how are they used in formulation?
The level system runs from 1 (black) to 10 (platinum blonde) and describes how dark or light a color is. Each level has a predictable lightening background: level 5 reveals orange, level 7 yellow-orange, level 9 pale yellow. How much a dye lifts is set by each product line. On the Spanish Koleston Perfect chart, a 1:1 mix with 40 vol lifts 3 levels, and the Blonde Specials at 1:2 reach 4-5. Beyond that you need prior bleaching.
(Image: color level scale from 1 to 10 with the underlying pigments of each level)
Table of levels with lightening backgrounds
Every level has an associated lightening background, the pigment that shows up as you lift the hair:
| Level | Description | Lightening background |
| 1 | Black | Dark red |
| 2 | Very dark brown | Red |
| 3 | Dark brown | Red-orange |
| 4 | Medium brown | Red-orange (orange-red) |
| 5 | Light brown | Orange |
| 6 | Dark blonde | Yellow-orange |
| 7 | Medium blonde | Orange-yellow |
| 8 | Light blonde | Yellow |
| 9 | Very light blonde | Pale yellow |
| 10 | Extra light blonde | Very pale yellow |
The chemistry explains it: melanin oxidizes in a predictable sequence. Eumelanin (the dark pigment) breaks down first, progressively revealing the warm pheomelanin underneath. If you lift a level 4 and orange-red appears, it’s not a mistake. It’s chemistry, and knowing that lets you neutralize it correctly.
To go deeper on reading levels, see our complete guide to color levels.
How to identify the natural level
Misdiagnosing the level is one of the most common errors. The correct process:
- Proper lighting: natural or neutral white light. Never the warm light of the salon.
- Right zone: the nape, least affected by sun.
- Dry hair: wet hair looks darker.
- Compare with a swatch book: don’t rely on your eye alone.
- Consider gray hair: it can raise the perceived level.
How many shades does a hair dye lighten in one application?
It’s a rule of thumb, and manufacturer sheets refine it. Wella Spain, for example, assigns Koleston Perfect at a 1:1 mix with 40 vol 3 levels of lift, while 4-5 levels are reserved for its Blonde Specials, mixed 1:2.
Examples using that chart:
- Level 3 → level 6 with a 1:1 mix and 40 vol
- Level 5 → level 8 with a 1:1 mix and 40 vol
- Level 6 → level 10 only with Blonde Specials at 1:2 and 40 vol
To lift further, you need prior bleaching.
What do the numbers after the period mean in the dye numbering?
The number after the period defines the tone, but it depends on the brand. On the Spanish Majirel chart, .1 is ash, .3 gold and .4 copper. In Wella, /2 is matte and /7 is brown. In a code like 7.13, the 7 is the level (medium blonde), the 1 the dominant reflection (ash) and the 3 the secondary (gold). Beyond 3 reflections in a mix, the result tends to get muddy.
After the level comes the reflection, the number that defines the tone of the color.
Each brand numbers its reflections in its own way
Brands don’t share a numbering system. The same number can mean something different from one brand to another. (You can compare exact notation in our dye converter.) Some examples, each tied to its own chart:
| Brand | Number | Reflection |
| L’Oréal Majirel (Spanish chart) | .1 | Ash |
| L’Oréal Majirel (Spanish chart) | .3 | Gold |
| L’Oréal Majirel (Spanish chart) | .4 | Copper |
| Wella Koleston Perfect | /2 | Matte (green) |
| Wella Koleston Perfect | /4 | Copper (Spanish chart) |
| Wella Koleston Perfect | /6 | Violet (cool) |
| Wella Koleston Perfect | /7 | Brown |
| Schwarzkopf Igora Royal | -4 | Beige |
| Schwarzkopf Igora Royal | -7 | Copper |
| Schwarzkopf Igora Royal | -8 | Red |
How to read the numbers
In a code like 7.13:
- 7 = Level (medium blonde)
- 1 = Primary reflection (ash)
- 3 = Secondary reflection (gold)
Result: a medium ash blonde with a golden undertone, a warmer ash that is less cold than a pure 7.1.
Rules for mixing reflections
- Cool reflections (in L’Oréal notation, .1 and .2) neutralize warm tones.
- Warm reflections (in the same notation, .3, .4, .5 and .6) add luminosity.
- Natural base (.0) softens and gives body to the color.
- Stay within 3 reflections. Beyond that, the color dulls and becomes unpredictable.
Predict the exact result of mixing two tones with our color mix predictor. For exact proportions when combining dyes, see our guide to mixing dyes: ratios and professional rules.
What volume of oxidant should I use and why does it matter so much?
The oxidant determines how many levels you lift and how much you damage the fiber. 10 vol (3%) deposits without lifting. In the Igora Royal guide, 20 vol (6%) lifts 1-2 levels, 30 vol (9%) lifts 2-3 and 40 vol (12%) up to 3-4 with its 10- series. The golden rule is to use the minimum volume necessary. Every extra 10 volumes adds 3% hydrogen peroxide, and fiber damage grows with concentration.
The oxidant isn’t just “the liquid you mix with the dye.” It’s an active component that shapes the final result.
(Image: four mixing bowls showing oxidant volumes of 10, 20, 30 and 40 vol)
Volumes and their lightening power
| Volume | Concentration | Lift in Igora Royal | Main use |
| 10 vol | 3% | Darken | Deposit, toning |
| 20 vol | 6% | 1-2 levels | Standard, gray coverage |
| 30 vol | 9% | 2-3 levels | Highlights, dark bases |
| 40 vol | 12% | Up to 3-4 levels (10- series) | Super-lighteners and bleaching (with caution) |
The chemistry explains it: the increase is linear, not doubling, with 3% hydrogen peroxide for every 10 volumes (3, 6, 9 and 12%). The higher the concentration, the more damage to the hair fiber. More oxidant doesn’t mean a better result. It means more damage.
To understand when to use each volume, see our guide to oxidants and volumes.
Dye:oxidant ratio
The ratio is set by the product line you use, not by the technique:
| Product line | Ratio | Notes |
| Wella Koleston Perfect | 1:1 | The most common |
| L’Oréal Majirel | 1:1.5 | Its High Lift super-lightener is separate, at 1:2 |
| Igora Royal 12- series | 1:2 | Its 10- series, also a super-lightener, is 1:1 |
| Semi-permanents and color baths | Per their sheet | Varies from line to line |
How are unwanted tones neutralized in colorimetry?
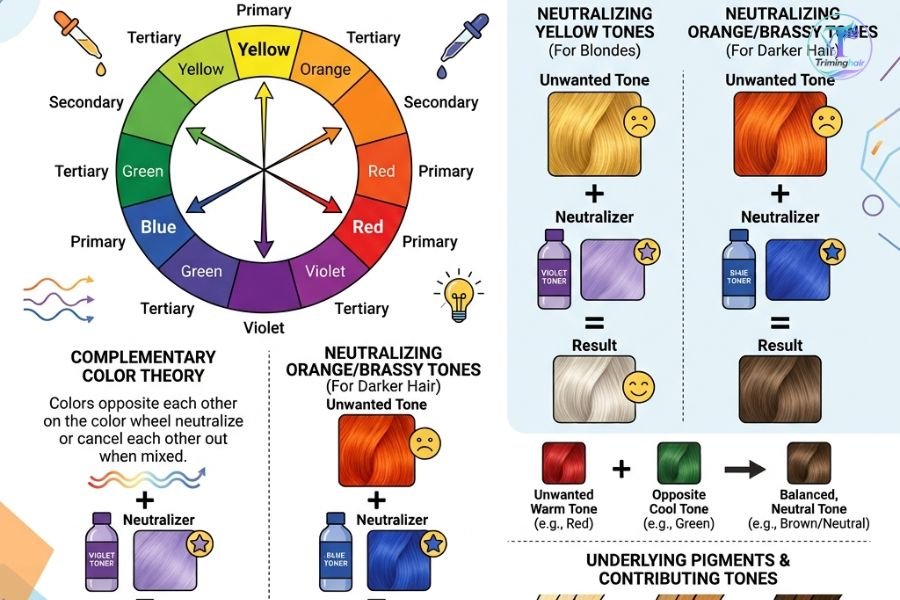
Neutralization applies complementary colors in doses that grow with the intensity of the unwanted tone: a little corrector if it’s mild, more if it’s strong. Orange (levels 5-6) is neutralized with ash .1. Yellow (levels 8-9) is neutralized with violet (.2 in L’Oréal, /6 in Wella). Red (levels 2-4) is neutralized with matte, which is green (.7 in L’Oréal, /2 in Wella). Avoid pure complementaries at 100%: diluted with a natural tone, the result stays clean.
Mastering neutralization is what separates a good colorist from an excellent one. It’s the practical application of everything above.
Basic principle
Complementary colors cancel each other, but the key is in the proportions:
- Mild unwanted tone: a small part of corrector
- Medium unwanted tone: a bit more corrector
- Intense unwanted tone: the highest dose, short of pure corrector
Case studies
Neutralizing orange (levels 5-6)
- Use ash reflections (.1).
- Sample formula: 7.1 (30 g) + 7.01 (20 g) + 7.0 natural (10 g).
- The natural touch keeps it from looking “dirty.”
Neutralizing yellow (levels 8-9)
- Use violet reflections (.2 in L’Oréal, /6 in Wella).
- Use dedicated toners.
- Keep the time short, as the toner sheet indicates.
Neutralizing red (levels 2-4)
- The complement of red is green, and on the chart that green is matte: .7 on the L’Oréal chart, /2 on the Wella chart.
- Watch the numbering. A .13 is not matte. It’s ash + gold (blue + yellow), which L’Oréal sells as beige, and it won’t correct red.
- Dose the matte alongside the natural base of the target level, never pure.
- It requires more time and patience.
For specific techniques, see our guide to neutralizing unwanted tones. For gray hair, neutralization takes a different approach: the Quiet Silver trend uses natural gray instead of eliminating it, relying on cool undertones to make gray part of the design.
What information do you need to gather before formulating?
A complete professional diagnosis covers three blocks: hair history (last color, brand, prior henna, bleaching), current condition (natural level at the roots, porosity, elasticity, percentage of gray) and desired result (visual references, written expectations). Without this analysis, any formulation is a guess. Incomplete diagnosis is the source of most salon mistakes.
Before mixing anything, you need information.
1. Hair history
Key questions:
- When was the last color?
- What brand and shade was used?
- Has the client ever used henna?
- Any highlights or bleaching?
2. Current state
- Natural level: at the root area
- Level in mid-lengths and ends: may differ because of prior treatments
- Porosity: high porosity absorbs fast, low porosity needs more time
- Elasticity: indicates fiber health
- Percentage of gray: affects the formulation
3. Desired result
- Show visual examples.
- Agree on realistic expectations.
- Document it in writing.
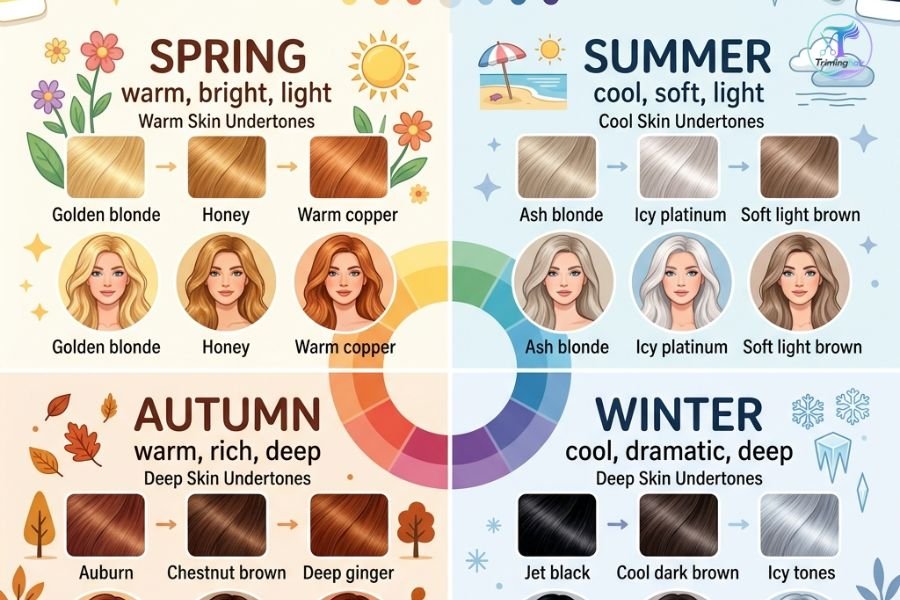
To help clients identify which color family suits their skin tone and undertone, see our guide on which hair color suits you. The most common diagnosis errors are in our guide to mistakes when formulating color.
Also Like To Read This: Colorimetry Test: Discover Your Ideal Hair Color & Color Season
How is a color formulated step by step?
Formulation follows 5 steps in order: (1) set the target level and check that it’s reachable with dye, (2) calculate the level difference to choose the oxidant, (3) identify the lightening background and whether it needs neutralizing, (4) choose primary + secondary reflections, plus a natural base if needed, (5) calculate proportions by density and length. Skipping any step produces unpredictable results.
Step 1: Determine the target level
What level does the client want to reach? Is it achievable with dye, or does it need bleaching?
Step 2: Calculate the level difference
Target level − current level = level difference.
This determines the oxidant you need.
Step 3: Consider the lightening background
Which pigment will appear as you lift? Does it need neutralizing?
Step 4: Choose reflections
- Primary reflection: the dominant one
- Secondary reflection: tones or balances
- Natural base: softens if needed
Step 5: Calculate proportions
Adjust amounts according to:
- The intensity of neutralization needed
- Hair length
- Hair density
Practical example
Client: natural level 5, wants a cool medium ash blonde (7.1).
- Difference: 7 − 5 = 2 levels → 20 vol oxidant if your line allows it (in Igora Royal, 20 vol lifts 1-2 levels; Koleston Perfect calls for 30 vol for 2).
- Lightening background, levels 5-7: orange → needs ash.
- Formula: 7.1 (40 g) + 7.01 (15 g) + 7.0 (5 g) + 20 vol oxidant (60 ml).
- Time: 35-40 minutes, always within the range on the manufacturer’s sheet.
- Expected result: medium ash blonde with no orange banding.
What are the most common mistakes when formulating color?
The 5 most frequent mistakes are: diagnosing the level by eye without a swatch book, ignoring chemical history (unpredictable reactions with previous products), using too much corrector (muddy results), skipping the strand test in doubtful cases, and mixing one brand’s dye with another’s oxidant. Each has a concrete fix, and all are avoided with protocol and rigor.
1. Diagnosing by eye
Problem: the perceived level is not the real one.
Solution: always use a swatch book and the right light.
2. Ignoring history
Problem: unpredictable reactions with previous chemicals.
Solution: keep a detailed record for every client.
3. Too much corrector
Problem: muddy or dull tones.
Solution: start with less and add if needed.
4. Not doing a strand test
Problem: unpleasant surprises at full scale.
Solution: always test in doubtful cases.
5. Mixing brands
Problem: each system is calibrated internally.
Solution: use dye and oxidant from the same line.
How to formulate for the most common cases in the salon?
The four most common scenarios need different approaches: darkening (10 vol, ignoring the background), lifting 2 levels from level 5 (20 vol in Igora Royal or 30 vol in Koleston Perfect, with ash .1 for the orange background), covering more than 50% gray (20 vol and, in Koleston Perfect, half a natural tone), and correcting orange at level 6 (7.1 + 7.01 + 7.0 with 20 vol). This table gives a starting point for each.
| Common case | Starting level | Target level | Sample formula | Oxidant | Key point |
| Darken 2 levels | 7 | 5 | 5.0 (60%) + 5.1 (40%) | 10 vol | The background doesn’t interfere when darkening; 10 vol deposits without damage |
| Lift 2 levels | 5 | 7 | 7.0 (40%) + 7.1 (30%) + 7.03 (30%) | 20 vol in Igora Royal, 30 vol in Koleston Perfect | The orange background of levels 5-6 needs ash (.1) to neutralize |
| Cover gray (>50%) | 6 (with gray) | 6 | 6.0 (50%) + 6.1 (50%) | 20 vol | With 50-100% gray, the Spanish Koleston Perfect chart adds half a pure natural tone |
| Correct orange | 6 (orange) | 7 ash | 7.1 (50%) + 7.01 (33%) + 7.0 (17%) | 20 vol | The .01 adds coolness without muddying; the .0 balances |
Basic calorimetry problems
A quick spelling note: calorimetry (with an “a”) is the measurement of heat. Colorimetry (with an “o”) is the measurement of color. They sound alike but belong to different sciences. If you landed here searching for basic calorimetry problems, this section and the next three are for you, and each one ties back to the salon.
Basic calorimetry problems ask you to find a heat quantity, a mass, a specific heat or a temperature change when heat moves between substances in an insulated system. The principle is conservation of energy: heat lost by the hot object equals heat gained by the cold one.
Example problem: a 25.0 g metal sample at 100.0 °C is dropped into 100.0 g of water at 20.0 °C. The final temperature is 23.0 °C. What is the specific heat of the metal? (Specific heat of water: 4.184 J/g·°C. Ignore the container.)
- Heat gained by the water: 100.0 g × 4.184 J/g·°C × 3.0 °C = 1,255 J
- Heat lost by the metal: 25.0 g × c × 77.0 °C = 1,925 g·°C × c
- Setting them equal: c = 1,255 / 1,925 ≈ 0.65 J/g·°C
Salon connection: heat is why a processing lamp or heat cap shortens development time. On the Spanish Koleston Perfect chart, for example, a full head at the same depth or darker takes 30-40 minutes without heat and 15-25 with heat. More heat means a faster reaction, not a better one, so heat is still a variable to control.
Basic calorimetry equation
The basic calorimetry equation is q = m · c · ΔT, where q is heat (J), m is mass (g), c is specific heat (J/g·°C) and ΔT is the change in temperature (final − initial, in °C).
Related equations you’ll use constantly:
| Situation | Equation | Meaning |
| Heat transfer between objects | q_lost + q_gained = 0 | Heat leaving one equals heat entering the other |
| Calorimeter heat capacity | q_cal = C_cal · ΔT | Heat absorbed by the calorimeter itself |
| Reaction in a calorimeter | q_rxn = −(q_solution + q_cal) | The reaction’s heat is opposite to what the surroundings gain |
| Enthalpy per mole | ΔH = q_rxn / n | Heat change per mole of reactant |
Sign convention: if the surroundings warm up (ΔT positive), the reaction is exothermic and q_rxn is negative. If they cool down, it’s endothermic and q_rxn is positive.
Salon connection: the same logic applies to oxidation. Hair color development is exothermic, so the mix warms slightly as it works. That is why a bowl of mixed dye left too long loses effectiveness, and why a fresh mix is always the safer choice.
Solving a basic calorimetry problem (ALEKS-style)
Online chemistry platforms such as ALEKS present calorimetry problems in a consistent pattern, and the same method works on any of them. This guide is independent of ALEKS, so always work from your own problem’s numbers and use your course’s rules for rounding and units.
- Read and list the givens. Write down mass, initial and final temperatures, specific heat and any calorimeter constant.
- Identify what’s asked. Heat (q), specific heat (c), a final temperature, or ΔH?
- Choose the setup. A hot object into water: use q_lost = −q_gained. A reaction in a coffee-cup calorimeter: q_rxn = −q_solution.
- Plug in and solve. Keep ΔT as final minus initial, and carry units through every line.
- Check sign, units and significant figures. Give q in J or kJ as requested, with the number of significant figures the givens allow, and make sure the sign matches exothermic (−) or endothermic (+).
Second example: dissolving a salt in 100.0 g of water raises the temperature from 22.0 °C to 27.5 °C. How much heat did the solution absorb? (Use c = 4.184 J/g·°C.)
- q = 100.0 g × 4.184 J/g·°C × 5.5 °C = 2,301 J ≈ 2.3 kJ
- The solution gained heat, so the reaction released it: q_rxn ≈ −2.3 kJ (exothermic).
Common slips: forgetting that ΔT is final − initial, using the wrong mass (water vs. total), and mixing J with kJ.
Colorimetry method
In the lab, the colorimetry method measures how much light a colored solution absorbs to determine its concentration. It rests on the Beer-Lambert law: A = ε · l · c, where A is absorbance, ε the molar absorptivity, l the path length and c the concentration.
The basic procedure:
- Prepare standards: solutions of known concentration.
- Set the blank: zero the colorimeter with the solvent alone.
- Choose the wavelength: the one the solution absorbs most.
- Measure absorbance: read each standard and plot absorbance vs. concentration (the calibration curve).
- Measure the unknown and read its concentration off the curve.
The salon method follows the same logic with different instruments. Instead of a colorimeter, you use your eyes, a swatch book and neutral light to read a color objectively and compare it to a reference:
| Lab colorimetry | Salon colorimetry |
| Blank | Neutral lighting, dry hair, nape zone |
| Standards | Swatch book |
| Measurement | Level and reflection diagnosis |
| Calibration curve | Brand chart and manufacturer sheet |
| Result | Formula and expected outcome |
Both depend on the same principle: control the conditions, compare against a known reference and document the result.
Frequently asked questions
How many levels can a hair dye lift?
There’s no single limit: each line sets its own. On the Spanish Koleston Perfect chart, a 1:1 mix with 40 vol lifts 3 levels, and its Blonde Specials at 1:2 reach 4-5. For more lift, you need prior bleaching. The limit exists because the dye deposits pigment while it lifts, which reduces its lightening power.
Why does orange appear when bleaching?
Orange is the lightening background of levels 5-6. It appears because as melanin is removed, the underlying pigments (pheomelanin) become visible. It’s a normal chemical process, not a mistake. Pheomelanin, the natural red-yellow pigment, resists bleaching better than eumelanin, as Wolfram and Albrecht measured in the Journal of the Society of Cosmetic Chemists (vol. 38, pp. 179-191, 1987). It’s neutralized with blue/ash.
What’s the difference between .1 and .01 in the numbering?
The .1 is a pure, dominant ash. The .01 is a natural base with a soft ash undertone. The first is stronger for neutralizing; the second is more natural and less cool.
Can I mix oxidants of different volumes?
Yes, to get intermediate volumes. The mix is proportional: in equal parts, the volume lands halfway between the two. Both must be from the same brand.
What’s the difference between colorimetry and calorimetry?
Colorimetry measures color (hue, level, absorbance). Calorimetry measures heat (q = m·c·ΔT). In hair color you use colorimetry to formulate and a bit of calorimetry thinking to understand why heat speeds up processing.
In summary
Basic colorimetry is built on these pillars:
- Color theory: complementary colors neutralize each other.
- Level system: from 1 to 10, each level has a predictable lightening background.
- Reflections: the numbers after the period define the final tone, and each brand defines its own.
- Oxidants: use the minimum needed for the result, not the maximum available.
- Diagnosis: without accurate information, there is no correct formulation.
- Colorimetry vs. calorimetry: one measures color, the other heat, and the same discipline of controlling variables and documenting results applies to both.
,

Leave a Reply